You want to start painting and need an easel for that. But you don’t want to spend big on one since you’re just starting out. Or maybe you’re a creative type who loves to play with stuff and make things out of discarded materials. Whatever reason you’ve got, if you have a step ladder lying around, you can make one yourself.
If you haven’t yet figured out how to make an easel from a step ladder, the process can be quite a cinch, so long as you have the basic DIY skills. It only takes a few pieces of wood and some basic tools to make the canvas holder that you can attach to your step ladder.
Let’s show you how it’s done in a few simple steps.
Materials Needed to Make an Easel from A Step Ladder
You’ll want a few supplies handy to make your easel from a step ladder. Here’s a list of what you’ll need:
- Step ladder (as tall as preferred)
- 1x3x8 wood board
- 1x2x8 wood board
- A can of screws
- Wood glue
- Rungs
- Saw (a hand saw will work just fine)
- Drill
- Drill bit the same size as your screws
How to Make an Easel from A Step Ladder?
Let’s now walk through the process of making an easel from a step ladder. Follow these simple steps, and you’ll have your easel in no time.

Step 1: Tighten the Step Ladder Bolts
Before you start with the boards, it’s important to tighten the step ladder bolts, so they don’t fall apart when you are trying to make the easel. After all, you don’t want the whole project to collapse every once in a while. To do this, just use a wrench to turn each bolt until they are nice and snug.
Step 2: Measure the Distance Between the Bars
Now it’s time to take some measurements. You’ll need to know the distance between the bars on the step ladder so you can cut the wood boards to size. To do this, simply place a measuring tape between any two bars and note the measurement. You’ll need two measurements, one for the width and one for the height where you’ll attach the boards.
Step 3: Cut the Wood Boards to Size
Next, you’ll need to cut the wood boards to size. The boards can be either plywood or MDF, and if you’re ready to spend a little more money, you can also get them in hardwood like maple or cherry. Your 1x3x8 wood board will be the back support for the canvas, whereas the 1x2x8 wood board will be used to create the base of the easel.
It’s best to make all the cuts at once, so everything is ready when needed. To do this, first, measure and mark the boards according to the measurements from Step 2. Then, using a saw, cut the boards to the size preferred.
Step 4: Make the Base for The Canvas
Now it’s time to start putting the pieces together. The first step is to make the base for the canvas. You’ll need two rungs, only long enough to extend outwards from the sides of the step ladder.
Using the drill and screws, attach the rungs to the legs of the step ladder at the desired height. Make sure the screws are long enough to go through the rungs and into the legs of the ladder, but not so long that they come out the other side.
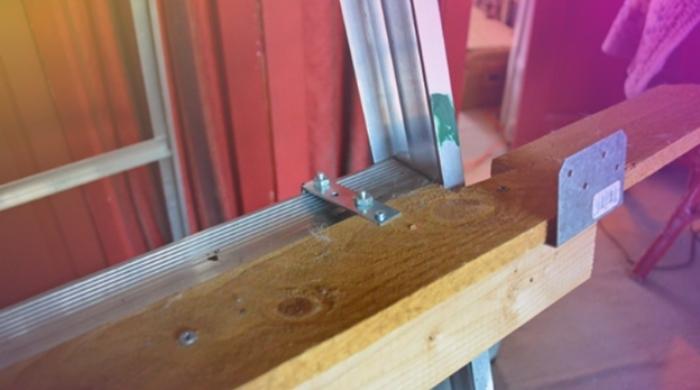
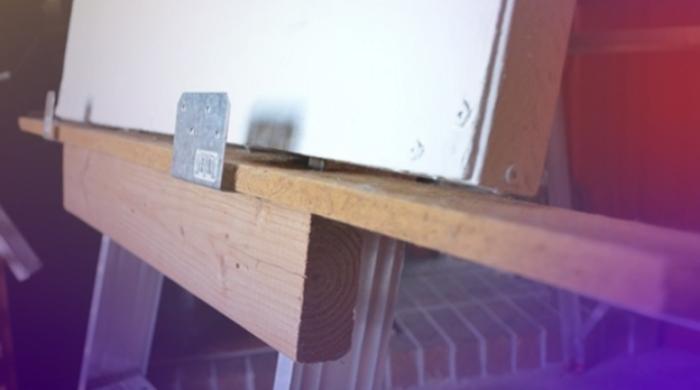
Step 5: Attach the Wood Boards to The Rungs
Once the rungs are in place, take a long-cut piece of the 1×2×8 wood board and attach it to the front of the rungs using wood screws and glue (if needed). You can choose to reinforce the base further by gluing an extra wooden piece beneath the main board. This will add extra stability to the easel. If done right, it should look something like the picture below.
Step 6: Place the Back Support
Now it’s time to add the back support for the canvas. This is where the 1x3x8 wood board will come in handy. Simply take the cut piece and attach it to the back of the rungs using screws.
Again, ensure the screws are long enough to go through the wood but not so long that they hinder the opening and closing of the ladder. And that’s it. Your easel is now complete.
Step 7: Make a Shelf for the Paints and Brushes (Optional)
You can also make a shelf for the paints and brushes if you want. This is optional, but it can be helpful if you always want your stuff near at hand. Just take a small piece of wood (about 6 inches by 6 inches) and screw it a step below with rungs just as you did for the base.
Frequently Asked Questions
Below, we have provided answers to some frequently asked questions that should help with the process of making an easel from a step ladder.
Can I Use Any Type of Wood for This Project?
You can use any type of wood, but we recommend using either plywood or MDF as they are inexpensive yet reliable options. You could also use hardwood, but this will be more expensive.
Can I Use Drywall Screws for Attaching the Wooden Pieces?
You can, so long as they are long enough to go through the wood and into the ladder. But it isn’t wise to use those with thicker heads as they can make it difficult to open and close the ladder.
Did Bob Ross Use a Ladder for An Easel?
Yes, artist Bob Ross used a step ladder easel on his show “The Joy of Painting,” which aired from 1983 to 1994. His easel featured a shelf on the lower part of the ladder where he kept his paints and brushes.
Conclusion
If you’re looking for a way to stretch out your creativity while making your life easier, you should not miss the chance to learn how to make an easel from a step ladder. It will help you create the perfect base for any house painting or artwork you want to do.
But best of all, you’ve got an easel that you can use for years to come, from when you’re just starting out as a beginner or a seasoned veteran. With that said, take hold of your own canvas holder now and start enjoying the many benefits it can bring.